College Admissions & Recruitment

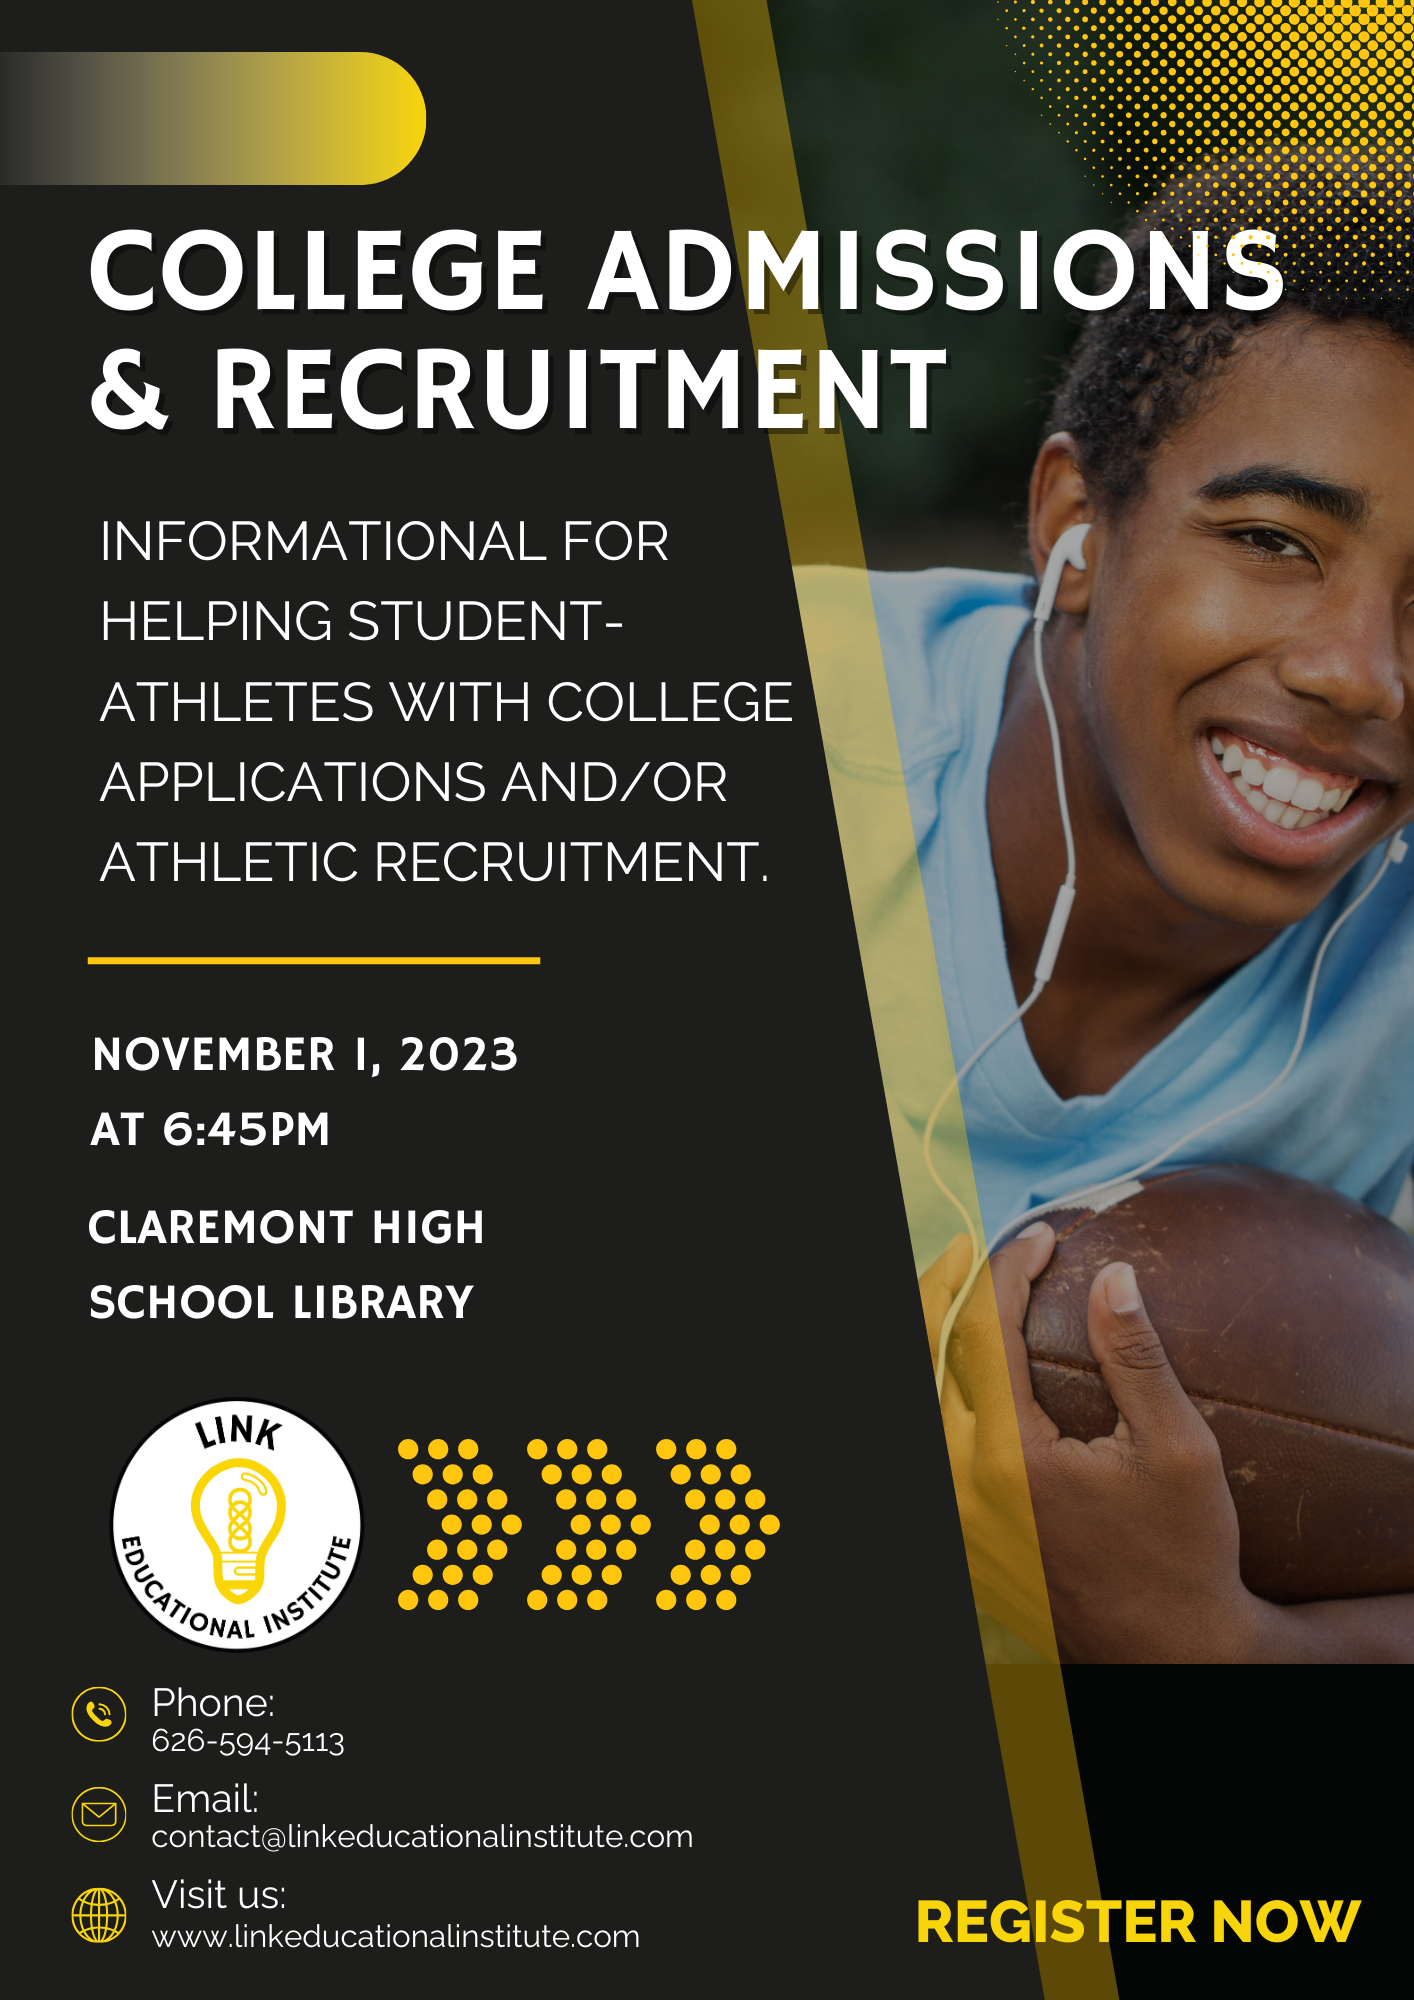
JOIN US FOR AN IN-PERSON INFORMATIONAL FOR PARENTS

November 1st in an in-person informational for parents on how you can help your student-athletes with their college application or recruitment.

Date and time: November 1, 2023 @ 6:45pm

Location: Claremont High School

The journey from high school athlete to college competitor is a thrilling yet challenging adventure. Student-athletes possess a unique set of skills, dedication, and passion that not only make them outstanding on the field but also promising candidates for higher education. In this blog, we'll delve into the intricacies of college applications and athletic recruitment, offering invaluable insights to empower student-athletes as they embark on this transformative phase of life.

Balancing Academics and Athletics:

Success in the sports arena is vital, but so is excelling in academics. We explore effective time management techniques, study habits, and the significance of maintaining a strong GPA.

Choosing the Perfect Fit:

Selecting a college is a monumental decision. We provide guidance on evaluating colleges based on academic programs, campus culture, and athletic opportunities, helping student-athletes find their ideal match.

Crafting a Stellar Application:

From preparing a compelling resume to writing an engaging personal statement, we share expert tips to help student-athletes stand out amidst the competition.

Showcasing Athletic Prowess:

Creating an impressive athletic resume is key. We offer a template and advice on highlighting achievements, statistics, and experiences effectively, catching the eye of college coaches.

Communication with Coaches:

Navigating conversations with coaches can be daunting. We provide sample emails and phone call scripts, emphasizing the importance of clear, confident communication.

Types of Scholarships:

Understanding athletic scholarships, academic scholarships, and their requirements is crucial. We break down the different scholarship options available to student-athletes.

Securing Scholarships:

We share strategies for scholarship applications, including tips on preparing scholarship essays and presenting a compelling case for financial assistance.

Academic Challenges in College:

Preparing student-athletes for the rigors of college academics, ensuring they're equipped to handle the transition effectively.

Building Life Skills:

Beyond the game, life skills such as time management, leadership, and teamwork are invaluable. We discuss their importance and offer suggestions for their development.

How to Study Harder

How to Study Harder

The most difficulty part is starting - here are steps on how you too can study harder.

Creating a Study Ritual

1. Create a good study space. 

The first step to studying harder is to create a study space for yourself. Studying in the same space each day is effective because your mind will learn to associate a particular space with work. It'll be easier to get into the flow of studying when entering your study space.

Choose a study space that is free of distractions. Find a space away from television and other noises. You should not study in bed or on the couch. Choose a place with a desk where you can sit upright to work.

2. Stick to a study schedule. 

Once you've found a great space to study, create a study schedule for yourself. Having a regular study sessions will help you avoid procrastination and stick to your goals as a student. You should start planning your study schedule as you get your course syllabus -- that way, nothing will sneak up on you.

You should strive to prioritize studying. Place study time ahead of extracurricular or social activities. Try to study shortly after class or school each day.

3. Have specific goals for each study schedule. 

Studying without direction is not an effective way to learn and retain information. Go into each study session with specific goals in mind to try and make the most out of your study session.


Practicing Good Study Habits

1. Test yourself.

A vital part of studying is repetition. Test yourself on difficult material during each study session. Make flashcards with vocabulary words, dates, and other facts. Use these to test your knowledge. If you have a math exam, do practice tests in your math book. If your teacher or professor provides practice exams, take as many as possible.

Try to make your own practice tests. Review the types of questions your teacher asked on quizzes and try to replicate them in your own words. Make a test for yourself, containing 10 to 20 questions, and then complete the test.

2. Start with the hardest subjects. 

The most difficult subjects require the most mental energy. Start with this work first. After completing harder materials, studying easier subjects will feel a lot less stressful.


3. Use study groups effectively. 

Study groups can be a great way to maximize your studying experience and help you stay motivated. However, keep in mind that you need to use study groups effectively in order for them to have the best effect.

You should structure study groups as you would an individual study session. Choose which materials to focus on and have set timeframes and breaks. It's easy to get distracted if you're working with groups of people. A schedule can help you stay on task


4. Seek out help when you need it.

Remember, there's no shame in asking for help if you need it. If you are continually struggling with a particular subject despite diligent studying, seek out help from another student, a tutor, a teacher, or a parent. If you're a college student, there might be free tutoring centers on campus dedicated to helping students with a particular subject like writing, language, or math.


5. Take breaks and give yourself rewards. 

As studying is seen as a chore, allowing yourself breaks and rewards can help motivate you to study harder. Take breaks every hour or so to stretch your legs, watch television, surf the internet, or do some light reading. Provide rewards at the end of study sessions to motivate yourself to work harder. For example, if you study 3 days in a row treat yourself by ordering takeout.


Studying Smarter

1. Prepare your body and mind before studying. 

If you go straight from school to studying, you may feel burnt out and struggle to concentrate. Taking half an hour to prepare your mind and body for a study session can help you study more effectively.

2. Study with the right mindset. 

The mindset you have going into studying can affect the effectiveness of your study session. Work on fostering a positive mindset going into each study session.

Think positively when you study. Remind yourself that you are building new skills and abilities. Do not get discouraged if you struggle with something. Remind yourself you're studying because you need to improve so it's okay if you don't understand some material.


3. Use memory games. 

Memory games, always known as mnemonic devices, are a means of remembering information by creating associations. They can be extremely helpful when it comes to smart studying.

Many people remember subjects by stringing words together to form sentences, the first letter of each word signifying part of a topic that requires memorization. For example, the sentence "Kings play cards on fat green stools" can be used to help remember the taxonomy ranking for animals: kingdom, phylum, class, order, family, genus, and species.


4. Rewrite your notes. 

If you have notes, rewrite them. Rewriting the notes you have, and changing the wording slightly, helps you actively engage with the material. You're not just repeating information but trying to explain it over and over again. This can help you process information and more easily remember it later on

Taking Advantage of Class Time

1. Take good notes. 

Creating the proper resources for studying can help you. While you're in class, try to take good notes. These can serve as a valuable resource later on when you're studying.


Organize your notes by date and subject. Write the date on the top corner of the page at the beginning of class. Then, write headings and subheadings regarding the subject being taught. If you're searching for notes on a particular subject, it'll be easier to find later.


2. Read actively. 

When reading material for class, make sure you read actively. How you read can affect how well you retain information later on.

Pay attention to chapter titles and subheadings. These often offer clues as to the main point of a text. It indicates what material you should pay the closest attention to while reading.


3. Ask questions. 

If you're confused about anything in class, ask questions. Usually, teachers will allow time for questions after class. You can also ask to stop by a student’s office hours to ask about topics that confuse you.

Do yourself a favor and make it a habit to visit your teacher's office hours starting at the beginning of the semester. Waiting to ask questions until the day before the test makes it seem like you haven't been preparing.

How to Revise Successfully

How to Revise Successfully

Find out how these three steps can make revising easier.

Part 1: Organizing Your Revision

1. Find a good place to study.

Find a quiet, well-lit place to work that will be comfortable and free of distraction. Log out or temporarily disable social media like Facebook, Twitter, or Instagram.

Some studies show that studying information in different places allows you to compartmentalize the information, making it easier to recall at a later date if you can associate the information with the location.

2. Draw up a timetable for your review and stick to it.

What do you hope to cover by the end of the week? By the end of the day? Working from a revision timetable helps you to make clear goals for each revision session and allows you to check them off as you progress. Revision plans can reduce anxiety, reassuring you that you've taken the necessary steps. Alternatively, if this isn't your style and your life is more unpredictable, write up a tick list/ to-do list of all the subject areas or units you need to cover.

3. Set reasonable study targets that you know you can reach.

Going over twelve chapters of trigonometry the night before a big exam is probably going to do more harm than good. Organize in the most effective way to remember the most important information you've got to study.

You could revise throughout the year by spending 15 minutes each day making notes you'll be able to rely upon later. By doing it in short stretches, you will remember more and feel less stressed.

Prioritize the most urgent and important topics on your schedule.

Part 2: Reviewing Actively

1. Engage your texts.

Rather than simply reading quickly over the sometimes-dull texts you've got to study, take a more active role by making Q cards with your own questions, 5 or so questions per card is appropriate and should cover all the information in the text. These questions can then be used for self-testing or get a friend/family member to quiz you, if you get it wrong, the answers are on the back! Bright colors help make this bit more fun too as well as organizing your subjects.

2. Recall and summarize.

As you're studying, stop every few minutes to recap what you've read. Write a short summary--a few sentences--in your notes, or at the bottom of the page. Use your own words. A good way of recalling is writing your notes down from memory and then going back over them and filling in the gaps with another color of pencil or pen. You'll know the different color refers to information you might have trouble remembering. Periodically, Try to repeat the process of summary, writing down on a separate sheet of paper what you know about a given topic or subject without consulting your books or your previous notes.

3. Draw or doodle freely while you study.

For a visual learner, it's important to break down information into drawings or diagrams, to make recall easier in the long run. Diagrams, mind maps, and freehand drawings can be useful ways of improving both your understanding and creating a much easier memory aid than reading the text alone. Do not be afraid to use colors in much the same way––color your drawing or highlight the text.

4. Find someone who knows nothing about the topic and explain to them.

Even if it is explaining to the mirror or your cat, just take the time out to talk to someone as if the person is learning about it for the first time, and you are the teacher. It is hard to forget information once you have done this, and also forces you to clarify the information and lay it all out in the most concise and simple way possible.

5. Try to use a study guide or an old test.

Answering past exams or test papers in the same time limit, as the real exam or test will gives you an opportunity to test yourself under the same constraints. It will be a chance to see whether there are gaps in your knowledge that you need to go back over and it'll also be useful to see if you can get down all that you want to say in the time allotted. Do the practices under timed conditions by using a timer, which could be on your phone.

6. Take breaks periodically to give your concentration a boost.

If you take breaks regularly, your concentration will be better and you will find yourself retaining more information than if you try to plow straight through. Don't waste energy and time revising with an over-tired mind that won't remember what it just read.

Try to stick to your schedule. Make sure to check off topics and subjects as you accomplish revising them. It may even be a good idea to reward yourself with a treat on the completion of a target to help you get there.

Part 3: Finding Support

1. Talk to your teachers.

Look on your teachers and professors as part of your support network and use them for the resource they offer. Ask for their assistance when it becomes clear you need it. Knowing earlier rather than later in your revision will make it easier to approach them and get their help.

2. Revise with other classmates.

Find a suitable group of good students who hope to succeed, and schedule regular meetings in between your other revision activities. Discuss the topics of revision, helping each other solve problems, understand the materials, and test one another over the reading. Studying in a group can be a great way of reducing anxiety levels and making revision fun, as well as productive. Find ways to test each other, playing revision games as challenges. Use flashcards or structure your study sessions like a quiz game. Chat online if you haven't time to catch up in person.

3. Let your family help you.

Your family can help support you even when they cannot understand what you are learning. Ask them to test you, clarify problems for you, read with you, and help you to stay organized. Parents and siblings who have already experienced revision will have some good ideas to help you prepare. Moreover, family and friends can be good moral support when you are feeling down or anxious about the revision.

4. Stay relaxed.

Spend time doing something relaxing each day, such as listening to your favorite music, going for a walk or swim, spending time with your pets, or talking with a good friend. These activities will help you to feel relaxed and connected to others and the world as you keep working through the revision. You can also practice relaxation exercises, meditation, or simply just lay back and chill out now and then ...Possibly with a Q card in your hand.


How to Pass Final Exams

How to Pass Final Exams

Tips and strategies to prepare you for the big day.

 Preparing Throughout the Semester

Read the syllabus.

At the beginning of any term, teachers or professors will usually hand out a syllabus with the assignments and expectations for a class. Make sure you read the syllabus carefully to know exactly what you need to do to pass the course.

Attend class regularly. 

You cannot successfully pass a class or exams if you do not attend the class. This will allow you to hear vital lectures and take notes, as well as help you understand your readings and assignments. 

Take notes. 

Lectures and discussions are key components of a class and contain information you will need to pass the exams. By paying attention and taking notes throughout the term, you will have a built-in study aid that will help you effectively study without scrambling for additional information.

Come prepared. Use a binder or notebook, and bring pens or pencils to class. If you will be discussing things from a book, bring a highlighter too.

Do all reading assignments.

Most professors and teachers will assign reading during the semester and then draw upon this as they write the exam. By doing the reading assignments, you will not only be able to participate in class discussions but will also have the information you need to pass the exam. Just like taking notes from lectures, you only need to write down the most important information.

Do papers and other class assignments.

Since class assignments are usually meant to help you learn a subject more thoroughly, it’s important that you do them. They may even serve as practice for exam questions. 

Prepping for Each Exam

Know where you stand in the class.

It’s important throughout a term to know what your grade is. If you keep this information in mind, it will help you know how much time you need to devote to studying for an exam.

Find out what material the exam is going to cover and what format it is.

Teachers and professors have different methods and formats for final exams. Some will make an exam comprehensive, while others will only test on a certain section of the material covered in class. Some exams are essay-based while others are multiple choice. 

Understand how you study best. 

Every individual learns differently. Knowing the conditions under which you study best will help you most effectively learn and retain the information that you need for your exam.

Prioritize your study time.

Figure out which exams are the most important and devote the most study time to them. By doing this you will optimize your study time and help ensure that you pass your exams.

Start studying early.

It is never too early to start studying for a final exam, but at the very least, a month before the test date is a good time to begin your preparations. This will ensure that you’re not cramming information too close to the exam and then forgetting it on test day.

Join a study group or class study session.

Taking part in a study group or attending a class study session can be very useful in understanding course material for an exam. Just make sure that you’re actually studying and not socializing.

Switch up your study spots. 

Studies suggest that changing your environment after spending a long time studying in one place can help improve your brain’s retention.

Do a practice exam. 

Practice exams are an excellent, highly effective way to study for tests. They will help you relax and point out any weak areas you may have. In fact, some studies suggest that practice-testing is a more effective way to study than highlighting, re-reading, or summarizing material. 

Stop studying.

At some point, you cannot study any longer without stressing yourself out or confusing yourself. Within a day of the exam, set aside your study material and be confident in the fact that you’ve done the work.


Caring for Your Body and Mind

Get enough rest.

It may sound like a good idea to stay up all night cramming, but without sleep, your brain just won’t function. Almost all students pull all-nighters at some point, but they can have damaging effects on your brain for up to four days.

Eat well.

If you’re not eating properly, your brain won’t be able to function at its best. Getting enough nutrients will allow your body and brain to function optimally on exam day and while you study. Make sure that you eat at regular intervals and don’t mindlessly snack on junk.
Stay hydrated.

It’s tempting to load up on caffeinated beverages when you’re studying for final exams, but be careful. Caffeine is a diuretic, meaning it will dehydrate you. It can also give you a wicked case of the caffeine jitters. Dehydration can cause fatigue, so drink plenty of plain, clear water. 

Use visualization.

There are several ways that visualization can help you feel more prepared for a final exam. You can use “outcome and process visualization” to help you imagine achieving your goal, and relaxation visualization to help you destress.

Reduce your anxiety.

This probably sounds counterintuitive: you wouldn’t have anxiety if you weren’t worried about passing your final exam, right? However, research shows that anxiety blocks your ability to focus, which can really put a damper on your studying and test performance. Try some relaxation techniques when you’re feeling freaked out. 

Get some exercise.

Physical exercise has been proven to reduce stress. It also helps you get better sleep, improves your alertness and concentration, and can even enhance how your brain functions. Regular aerobic exercise can even boost your learning and memory!

Take regular breaks.

Study breaks are important for several reasons. There’s a limit to what your brain can handle in any one study session. Trying to push past that without giving your body any time to recover will just leave you tired.


Performing on Exam Day

Cram for the exam.

If you didn’t have time to prepare for your exam in advance, you may need to cram, or learn as much as possible in a short period of time, for the exam. It’s not a very effective way to study, but cramming is better than not preparing at all.

If you haven’t done any reading, read the introductions and conclusions of any article and books. This will help you figure out the most important arguments and facts about a subject.

Stay calm.

You will likely be a bit nervous on the day of the exam, and it’s important to stay as calm as possible so that you can effectively take the test. There are different ways to help calm yourself, including having a good breakfast and taking a walk.

Eat and drink to stay alert.

You want to make sure that your body and brain are as alert as possible before and during an exam. Eating and drinking the right foods and beverages will help ensure that you not only are awake but also attentive to your exam. 

IMPORTANT!

  • Don’t eat heavy meals before an exam, which will divert blood from your brain for digestion. 

  • Make sure that you’re hydrated before an exam. One of the symptoms of dehydration is fatigue, so bring a bottle of water with you.

  • Chewing mints or mint gum will also help you stay alert.


Be confident.

If you’ve attended class, taken notes, done the assignments, and studied, you can be confident that you’re ready to take the exam. Having this confidence and visualizing yourself passing the exam will help you be successful.

Arrive before the exam starts.

In order to help yourself remain calm, make sure to arrive at the exam room before the exam starts. This will not only relax you but also ensure that you can get settled in to take the test.

Attack the exam strategically.

After you’ve given the exam a once-over, approach it strategically. This will help you maximize your knowledge and avoid getting “stuck” on things you don’t know.

Review your answers before you submit your exam.

Don’t cheat.

Whatever you do to pass an exam, never cheat. Looking at your notes, writing information on your hands, and copying from someone else's exam paper are all forms of cheating.

Pace yourself.

You only have a certain amount of time to complete an exam, so pace yourself as you work. This will ensure that you get through every section of the exam.

How to Memorise Long Text in the Shortest Amount of Time Possible

Method 1: Breaking the Text into Chunks

Divide the text into separate actions or objectives. 

Once you read through the text you want to memorize a few times, patterns will start to emerge. Use these patterns or themes in the text to split it up into smaller units. Your units won't necessarily correspond to whole paragraphs or even whole sentences. Rather, each smaller unit should discuss a single idea.

TIP: Look for phrases you already know that you won't have to work as hard to commit to memory.


Practice each chunk separately.

Now that you've found your chunks, start with the first one and repeat it until you feel comfortable with it and can recite it without looking at the text. Then move on to your second chunk and do the same.

TIP: Get a good familiarity with each of the chunks separately before you start to combine them.

Combine the first chunk with the second chunk.

Once you have a handle on your chunks, it's time to put them together so you can eventually memorize the whole text. 

Start with the first text and try to recite it from memory. But this time, instead of stopping with the first chunk, move on to the second chunk.

Repeat the process until you've memorized the entire text.

Once you have the first and second chunks combined as a unit, move on to the third chunk and practice all three together. This reinforces your memory of the earlier chunks as well. Keep adding new chunks until you've reached the end of the text you want to memorize.

TIP: Throughout the process, keep your eye out for transitions that you can use as triggers to combine the chunks together seamlessly.


Method 2: Creating a Memory Palace

Map out a familiar place in your mind.

The memory palace technique, also known as the "loci technique," has been around since the ancient Greeks. The idea is to think of a familiar place in your mind, then attach the text you want to memorize to the location you already have memorized. That place becomes your "memory palace."

TIP: Your "memory palace" doesn't have to be a single building or location. It can also be a route from one place to another. For example, you might use your route from home to work or school.

Assign parts of the text you want to memorize to rooms in the "palace." 

Go through your text and break it down into small bits. These could be as short as phrases or as long as paragraphs. Think about the rooms in your "memory palace" and the objects within them. 

TIP: Set a logical starting point and start connecting bits of the text to the objects in the room. The objects don't necessarily have to exist in the room. You can simply place them there in your mind.

Walk through your palace to connect the pieces together..

When you enter your palace mentally and walk through it, you'll encounter each piece of the text you're trying to memorize. Thread them together as you move through the palace, always taking the same route each time. It will probably take several walkthroughs for you to have the text down, but each walkthrough will reinforce your mental association between the visual image and the text.

Use the mental image to recall the text you want to memorize.

When you want to recite the text you've memorized, take yourself mentally back to your memory palace. As you walk through the rooms, recite the text based on the objects you encounter.

TIP: This technique may take some practice to master. If you're up against a deadline, it may not be the best time to create a memory palace. However, once you've used it a few times, you may find it enables you to memorize text more quickly.


Method 3: Trying Other Memorization Techniques

Memorize the first letter of each word of the text to create a shortcut.

Memorizing something is as much about your ability to recall the information as it is about committing it to your memory. 

TIP: To exercise your ability to recall, make a new page with only the first letter of each word in the text. Include punctuation so you can identify sentences and pauses. Then try to recall the text using only those first letters

Use your favorite memorization technique to better commit those words to your memory in the context of the text, then try the first letters again.

Turn the words into a song to help you remember them. 

The melody and rhythm of a song attach to the text and make it easier for you to remember. Use a familiar melody or a favorite song that you can fit the text into. It doesn't matter if the lines rhyme (they likely won't), as long as you can make it work as a song.

Walk around as you recite the memorized text to stimulate your brain.

Once you've committed the text to memory, you'll find you have better recall if you're able to move around while reciting it — especially if you were moving around while you memorized it. Being active stimulates blood flow to your brain to make it easier to recall a text you've memorized.

Connect images to the text if you're a visual learner.

You may find it easier to remember pictures than words, in which case this technique might work for you.

TIP: Similar to the memory palace technique, try to come up with an image for each of the main words in the text. Your brain will typically be able to fill in articles and other small words automatically.

If you enjoy emoji, you might try "translating" the text into emoji. Since those images are already familiar to you, it might make the text easier to remember.

Record yourself reading the text if you're an auditory learner. 

Some people can more easily commit things to memory by listening to them over and over. If that's you, record yourself reading the text you want to memorize so you can listen to it. The act of speaking and listening may enhance your memory.

How to Be the Best Student in Your Class

How to Be the Best Student in Your Class

Tips and learning strategies to stand ut in class and make the most out of your learning journey.

Getting the Most out of Learning

Get your brain and body ready to learn. 

Get lots of sleep. You'll need to get the right amount of sleep for your body if you want your brain to work at its best.

Learn in a way that works for you. 

Everyone learns best in different ways; this is called a learning style. Find a way that works for you and try to learn that way as much as you can.

TIP: For example, have you noticed that it's really easy for you to remember charts or pictures? This means you might be a visual learner.

Pay attention.

The best thing that you can do to become the best student in any class is to pay attention to when your teacher is talking. If you get distracted you might miss important information and you'll have a harder time understanding what to do or when you have to study later. 

If you're having trouble staying focused when your teacher is talking, try sitting in the front and participating more in the class.

Learn how to take notes.

Taking notes effectively can be tricky, but it will make it much easier for you to learn and study, which means your grades will get better and your test scores will improve so you're the best student in your class. TIP: Just remember, you don't have to write down everything your teacher says. Just write down the most important things and the things you know you'll have a hard time remembering.

Do your homework on time and well.

Even if you don't get very good grades on your homework, just doing it on time will help keep your grade up as much as possible. You should aim to make your homework marks the highest in the class or you're not really trying to be the best in your class. 

Look for extra ways to learn.

Learning stuff that isn't included in your classes can help you understand the information you do cover a lot better and it can also really impress your teacher.

Pursuing information in a way that follows your interests can also help you stay focused in class. Look for more ways to learn about all of the subjects you study and you'll find that all of the school is more interesting and that you're more and more successful.

Study earlier. 

When you see the number of portions just before a test, you may get scared. One of the most effective ways to get better scores on tests is to start studying and preparing for the test as early as possible. Definitely don't leave it until the night before.

TIP: Write down the possible questions that can come on the test and start jotting down key points.

Being a Good Person

Make people feel good, not bad.

Being the best student in a class is about more than just getting good grades. You should also work on being a good person. 

You don't want to be a bully or a class clown; that will not make you the best student in the class.

Focus on making people feel good by giving them compliments and telling them when they do a good job. Don't be mean to people and tease them or say hurtful things.

Be helpful to everyone.

Be a good person by helping people when you can. If you know how to do something or you have an easier way of doing it, show them how. Don't make yourself seem smarter or better, just be nice and friendly. You can also do small nice things, like holding a door open for them or helping them carry something heavy.

Be respectful to people, even when they're being mean.

Even when people are mean to you, you should still be respectful. Don't shout at them or physically hurt them. Don't call them names or cut in front of them in line, just to spite them.

Be respectful to people by not talking over them and definitely giving them a chance to talk if they want to. 

Respect their opinions and don't worry if they think a little bit differently than you. 

Stay calm.

When you're in class, stay as calm as you can. Don't run around and disrupt people. You should also try not to get stressed when school gets tough. This is bad for you and it might also cause you to lash out at other people

Focus on learning the material as well as you can and don't worry about the numbers or letters that your teacher assigns. Knowing the material is more important than getting a grade.

Make things fun for everyone.

Try to help everyone have fun. Be enthusiastic and positive when you're in class. This excitement to learn will make everyone feel more okay about learning. It might even get some people to show excitement when they wouldn't normally let other people see that they care.

Be yourself! 

Most importantly, be yourself. You can't be the best person you can possibly be if you're pretending to be someone else. Do the things that make you happy. Share the things that you love. Be friends with the people that get you and make you feel good about yourself. Don't worry about what other people think. The truth is that years from now, you won't even remember half of their names. If they don't think you're the coolest person now, you're not going to care in five or six years. What you will care about is how unhappy you are that you didn't do things that made you happy.

Making Your Teacher Happy

Be respectful.

If you want to make your teacher happy, being respectful is really the best way to start. Especially if other students are disrespectful, you'll stand out and quickly become their favorite

Don't be disruptive. Don't pass notes, talk to your friends, make jokes, or move around too much while your teacher is talking.

Be punctual (on time or even early) and definitely don't skip their class.

Ask questions.

Teachers like it when students ask questions. There are a few reasons for this. First of all, it tells them that you're paying attention.

Second, it shows them that you think they're interesting and that you're enjoying the subject (even if you're not). 

Third, it makes them feel smart and helpful. Everyone likes to feel smart and helpful. Ask questions when you have them and you'll find your teacher liking you more and more.

Ask for help.

Asking for help actually makes you look smart and it will make your teacher happy. When you ask questions, your teacher knows that you'll work hard and understand what they're teaching much better. They'll be proud of you for taking the initiative to get the help you know you need.

Be a helpful student.

Be a student that not only keeps out of trouble but also makes the classroom a kinder place. This is about more than just starting fights and arguments (although you shouldn't do those things either). This is also about being a person that helps solve problems when they come up.

Stay on top of your work.

Do your homework on time. Get study guides and ask for help at least two weeks before a test, and not two or three days before. 

Take notes. When your teacher sees you working hard, even if you're not the smartest and even if you don't get the best test scores, they'll still like you best.

How to Write a Letter Asking for an Extension

How to Write a Letter Asking for an Extension

Read the three-step process of writing an extension request.

Submitting a paper or course requirement can be a difficult task and there are times when you feel that you can not beat the deadline or there could be a risk that your paper is not meeting all the requirements. In such situations, it is advisable to send your instructor or professor a request for an extension.

Step 1: Following Formal Letter Writing Conventions

2. Prepare a header section

The date should go in the upper right corner of the page. Skip one line below it and then type out your address, also justified to the right.

Then, skip another line and place your recipient’s full address flush with the left-hand side of the page

2. Employ a formal and full salutation

Start by typing “Dear” and then follow with their title and last name. For example, “Dear Mr. Brady” or “Dear Ms. Smith.” Some titles can be more complicated, such as “Dear Professor Montgomery” or “Dear Senator Smith.”

3. Use a concise paragraph format.

The body of your letter should be somewhere between 1-3 paragraphs.

In many cases, you can open with 1-2 lines, explain your request in 2-4 lines, and conclude in 1-2 lines. If you need to expand to a full three paragraphs, simply separate the introduction, body, and conclusion.

4. Pay attention to your concluding remarks.

Don’t disregard the importance of a solid conclusion. Use your final sentences to restate your case (in one line) and to thank them for their time. You might write, “I appreciate your consideration of my request.”

If you need a reply by a certain time, you should include that information at this point as well. For example, “Thank you for your consideration and I look forward to hearing from you next week.”

5. Include your full name and signature

Below the “Sincerely,” leave 3-4 lines blank. Then, type your full name and justify it to the left. Use the blank space to sign your name in pen. If you plan to email your letter, you can delete those spaces and go directly to a typed name


Step 2: Crafting the Content of the Letter

1.Write a letter as soon as you can

  • As soon as you know you will need an extension, immediately begin preparing your letter. You need to give the recipient as much time as possible to make a decision about your situation. You also want to appear prepared, despite asking for an adjustment to the schedule

2. Determine how much extra time you will need.

  • Consider all factors and submit a realistic request. If you ask for too little time, you may need to request another extension. Missing deadlines should be avoided whenever possible. So, it’s best to overestimate a little.

  • Depending on the situation, in any case, it is better to ask for a longer amount of time so that you can compromise and meet in the middle.

  • Be aware of the time constraints facing the recipient as well. They may be under their own deadlines that will now need to be pushed back.

3. Be aware of the existing rules.

  • Verify the current deadline before you ask for it to be altered. You don’t want to appear disorganized by requesting an extension when you don’t understand the current situation. If this doesn’t work for you, then you can always cite the tight turn-around schedule

4. Include a sound explanation for your request.

  • You are taking the time to craft the letter and your recipient will then take the time to read it, so make it worthwhile. Carefully consider your true reason for needing the extension and honestly convey this to your reader. Don’t lie or exaggerate as this will only hurt your case. For instance, if you are completing a project that could potentially impact the safety of others, pointing this fact out when asking for extra time could work in your favor.

  • If you have multiple reasons for your request, choose the best one and focus on it.

5. Provide a few carefully chosen details as part of your request.

  • Details will give your letter a sense of legitimacy and craftsmanship. This is especially important if you are submitting your letter to a government panel or some other group that you have never met personally. For example, if your grandfather dies two days before your college essay is due, it is best to describe the incident as a “family emergency” as opposed to a general “emergency.”

  • Have your paperwork in order before submitting any request. You may need to lay out a timeline of prior actions and applications.

6. Stay positive in tone and content.

  • No one wants to read a letter that is one whiny line after another. Instead, describe negative events quickly and concisely and move on to the positive solution that you propose. For example, if you think that an initial salary offer is too low, you might write, "I need more time to consider your offer. I do, however, think that a higher salary would allow me to do my job more efficiently."

7. Proofread your letter prior to submitting it.

  • Give yourself at least a few minutes to read over your letter before you send it off. Look for editorial mistakes and typos. Run the grammar and spell-checking software on your computer. Send it off to a trusted friend for a quick second read-through.

Step 3: Sending the Letter to the Recipient

1.Make or save a copy of your letter.

As soon as you’ve proofread your draft, and prior to sending it off, take a photo (transfer to pdf), save a draft online, or make a traditional copy of your letter.

2. Place it in the standard mail.

Take your letter to the local post office, give it to your mail carrier, or drop it in a post box. If you want more assurance that your letter was received you can always request extra tracking services for an additional fee.

3. Email your extension request.

This is probably the best way to send your request as it requires little time and is very reliable. Verify your recipient’s email address before sending and include your identification number, if relevant, in the subject line.

4. Make a phone call instead of writing.

If your need for an extension is urgent or very last minute, you may be better served by talking to them in person or by calling. If this is the situation, continue to act formally and state your case in an organized way.

Writing an extension request requires a thoughtful and strategic approach. It is crucial to clearly articulate the reasons for the extension request and to provide evidence to support your case. A well-crafted extension request should also demonstrate a proactive approach to problem-solving, by outlining a plan for how the additional time will be utilized to achieve the desired outcome. With careful planning and a persuasive argument, individuals can successfully navigate the process of requesting an extension and improve their chances of achieving their goals. As with any written communication, attention to detail and a professional tone can make all the difference in conveying a message that is both clear and convincing.

How to Prepare for Your Classes: Tips for Creating a Study Timetable

How to Prepare for Your Classes: Tips for Creating a Study Timetable

Check out this three step process for preparing your timetable.

Setting Up Your Timetable

1.Review your current schedule to see how you spend your time.

  • Before you create a study timetable that’s perfectly tailored for your academic goals, get a sense for how you’re running your life right now.

2. Collect all the information you can about your class.

  • Review your syllabus to see all the exams, group discussions, essays, and assignments you’ll be responsible for. If you accidentally tossed it, ask your teacher for another one. 

  • See which tasks are more time-consuming.

3. Decide which times are optimal for studying.

  • Consider when your brain is alert and when you’re most energized. When it comes to reviewing your materials, are you a morning or a night person? After the sun rises and you chow down on a bowl of oatmeal, are you ready and raring to go? Or, do you like to eat dinner, wind down, and meticulously look over your notes?

4. Create your timetable grid.

  • Are you a big picture type of person? If so, you might want to make a study timetable that maps out a whole month. However, you may prefer to “chunk” your material and create a study timetable that outlines your week. 

  • Some apps specialize in study timetables—for instance “My Study Life” helps you record and track all of your exams and assignments.

5. Draw the grid for your timetable. 

  • A traditional timetable tracks all the days you’ll spend studying as well as the time you’ll allot for each task. Once you create a grid with plenty of squares (for example, a 7x8 grid), write the days of the week at the top. Once those squares are filled in, the rest can be used to block out times when you’ll study for tests, assignments, or presentations.

6. Choose a timetable template that you'll use every week.

  • If you’d like to streamline your process, design or download a timetable that you’ll print out and fill in every week. Create a batch of these timetables in one go based on the information you receive from your syllabus and your course management system, like Blackboard. All this prep will save you a lot of time in the long run.

  • Take into account big assignments or final exams and update your study schedule by adding blocks of time you'll use to study for them.

Filling in Your Timetable

1. Block your study times.

  • Aim for blocks of study time that are fairly long, such as 2–4 continuous hours. This will help you get into the groove of studying and make sure you're more productive with your time. 

2. Schedule time for breaks.

  • Breaks are essential to your success. After all, you're not a robot, and no one, not even your teacher, expects you to work non-stop for hours on end. 

Try the "Pomodoro Method": during the block of time that you're studying, commit to 25 minute stretches of concentrated work, then take 5-minute breaks.


3. Be as specific as possible.

  • Remember how you gathered all your assignments and syllabi? Now's the time to put them to use. Schedule blocks of time that represent when you'll study for all of your classes. Also, remember to fill out squares on your grid to note which assignments and presentations you'll be responsible for. For instance, instead of just writing "English," jot down: "Create an outline for an essay on postmodernism." You'll have a clear picture of what you need to prioritize.

4. Schedule multiple subjects during each session.

  • Keep in mind that it's totally okay to use one continuous block of study time to review concepts from different classes. For example, use a 4-hour block to review French vocabulary, chemical reactions, and business practices. 

  • Working on different subjects during a single session will keep you from getting completely burned out by intensely focusing on one subject and ending up with next to no energy to do anything else.

5. Color code your timetable to keep track of all your classes.

  • Color coding classes and responsibilities will help make your timetable easier to use and be easier on the eyes. You might be looking at this timetable a lot—make it your own! Who knows: you might end up enjoying the process of managing your studying time and sprucing up your timetable. Best case scenario? You'll see it as a fun and almost therapeutic activity that lets you get a little artistic.

Using the Timetable

1. Stick to the plans and schedules you agreed to.

  • It might take some time for you to really get used to fitting your life around your timetable and taking it seriously without any deviations. Just give it a chance. Once it’s a part of your routine, it’s going to be a big help. Plus, think of it this way—it's a great tool to ensure you dominate your classes. When you ace all your tests and earn an awesome grade, so many doors will open up for you. All that dedication gives you a great chance to treat yourself later.

2. Relax whenever you make any tiny slip-ups.

  • There's no reason to follow your timetable down to the exact minute. Look, if you start studying for Spanish at 5:05 P.M. instead of 5:00 P.M., it's not the end of the world.

  • Just focus on finishing up all your most important tasks while also factoring in time for some rest and relaxation. Ultimately, a timetable's a little system to help you perform better in your classes. Base your time on it, but don’t worry about not following it to the tee.

3. Revise your timetable if you need to adjust your study schedule. 

  • See what works and what doesn’t, and if something isn’t working, feel free to fix it. You already put effort into making the timetable—there’s no reason to scrap it when a few simple revisions could make it work well for you. While it's best to stick to your timetable, it's also important to update it if there are any new developments.

How to Email Your Professor for a Letter of Recommendation (Tips & Examples)

How to Email Your Professor for a Letter of Recommendation

Keep your professors’ contact information for future references and make sure to leave a good impression with them.

Step 1: Writing the Email

1. Greet your professor using their proper title

Begin your email just like you’d write a letter, and make a great first impression with a proper salutation like “Dear” or “Good afternoon.” Unless you’re on a first-name basis, it’s also good etiquette to address your professor by their professional title and last name.

2. Re-introduce yourself to refresh your professor’s memory. 

Even if you and your professor are on good terms, use the first 1 or 2 sentences of your request to remind them who you are. Give them your name, the classes you’ve taken with them, and any extracurricular or one-on-one activities you’ve done together too. Keep this section concise and get right to the point!

3. Explain the purpose of your email and why you need a letter.

Tell your professor what you’re applying for, with details about the educational program, internship, or job, and let them know that the application requires a letter of recommendation. Avoid starting a tangent or talking about other unrelated things; stay on task and show your professor that you mean business. 


For example, “I’m applying to UCLA’s graduate program for Film and Television, and I was hoping that you’d write a compelling letter of recommendation for me.”


4. Tell your professor why you want a letter from them.

Spend the next paragraph explaining how this professor impacted your life, what you learned from them, and why you asked them for a letter. You can also tell them a little more about yourself, why you’re applying for this particular position, and how you think their recommendation will help you get accepted.

5. Mention anything you want the letter of recommendation to include.

Start a new paragraph and tactfully let your professor know what information and experiences you hope they’ll discuss. Do this by bringing up the qualifications needed for the position or program you’re applying to and reminding your professor of instances that prove your abilities. That gives them a starting point when they begin the letter!

7. Inform your professor of the due date and how to submit the letter.

Submissions might be through a physical address or a digital address. If they’re submitting it digitally, provide either the email address or a link where they can upload the letter. Getting your application done in time will be much easier if your professor knows exactly when the letter is due and where to send it.

8. Thank your professor whether or not they write the letter.

In the last paragraph, let them know you value the time they spent reading your request and the time they’ll spend writing the letter. Thank them for their consideration, and tell them how much you appreciate their guidance thus far as your professor. No matter what happens, an earnest “thank you” is the polite thing to do!

9. Sign the email with a complimentary close and your name.

Below the final paragraph, use a closing statement like “Sincerely,” “Your former student,” or “Best regards.” Then, skip a line. Below that, write out your full name.

Step 2: Sending Email

Attach a cover letter and resume if you’re applying for a job or internship.

When your professor agrees to write the letter, they’ll need additional information about you and your qualifications. Write a cover letter, create a resume, and attach both so your professor doesn’t have to ask for them later on. Mention the attachments in your email, too.

Include a summary document listing the activities and courses you took.

Write a document that describes each course you’ve taken so far, your grades, any activities and clubs you’ve participated in, and awards you’ve received for your work. Then, attach it to the email so your professor can refer to the document while writing and better understand your qualifications.

Use a professional subject line that explains the purpose of your email.

Let your professor know up front that you’re requesting a letter of recommendation. They likely get a lot of emails, so a professional-sounding subject line will show your professor that the email is timely and important. 

Step 3: Choosing a Professor & Timing Your Request

Pick a professor who knows you well and will write a good letter.

A letter of recommendation adds flavor and personality to your application. Where resumes offer a technical overview of your experience, letters of recommendation show who you are, what you can do, and what it’s like to work with you. Therefore, your letter will be stronger if the professor has a personal relationship with you.

Think of a backup plan if your first choice doesn’t work out.

Sometimes the professor might decline—not because they don’t want to, but because they feel like they know enough about you (or the position you’re applying for) to do the letter justice. That’s okay! Before sending out the first email request, brainstorm several professors you could ask for a letter. If anything happens, just send the next professor a request.

Make your request at least 4 to 6 weeks in advance, if possible.

Professors have a lot to do, from grading, teaching, and lesson plans to helping other students. You’re more likely to get a positive response if you give them plenty of time to write a letter! Ask them for the letter well before the due date so they don’t feel rushed and you have time to look for another reference if necessary.

Follow up with your professor 3 days before the letter’s due date.

Give your professor a few days to accept after sending your initial request. Then, once they do, set a reminder to reach out again 3 days before the letter’s deadline. If they haven’t sent over a letter of recommendation by then, check in with a polite reminder and ask them for an update.


For example, “I’m writing to touch base about the letter of recommendation for my internship application and ensure you have everything you need from me since the deadline is April 1st. Let me know if there’s anything else I can provide for you!”